Can You Use Oil Based Polyurethane Over Latex Paint?
A high-quality latex paint is important for various wood projects such as cabinets, tabletops, and bar tops.
Latex paint adds some shine and a well-polished effect to your wooden projects, but what is polyurethane? And how can you use oil-based polyurethane over latex paint?
Polyurethane is a varnish that has the ability to give your projects a solid and hard finish; this clear varnish has been sought after by a lot of people in recent years as it makes the surface of wood (which, if necessary, can be unwarped using these methods) easy to clean, and prevents both peeling and scratching. Super awesome, right?
What You Need To Know About Polyurethane
Polyurethane comes in two options: water-based polyurethane and oil-based polyurethane.
The best part is that both varieties can be easily used over latex paint, but the application specifics differ in some ways. Here's how:
1. Water-Based Polyurethane
The water-based option of polyurethane is a clear (transparent) varnish that is best used if you want to see the latex paint underneath.
There is one major disadvantage of this option though, and that is its lack of ability to provide a very hard & solid finish.
2. Oil Based Polyurethane
Oil-based polyurethane can be considered the master of polyurethane as it provides a hard and solid finish.
Its disadvantage is noticeable: yellowing can be observed after some time, and this makes it hard to see the color of the latex paint underneath.
You may find this video helpful:
How To Use Polyurethane Over Latex Paint - Preparation
Using oil/water-based polyurethane over latex paint is pretty easy, but the first step is to prepare the surface of your wooden project.
Preparing the surface is pretty simple: all you have to do is wait for the latex paint to dry completely before you sand the surface lightly then simply remove sanding dust with a lint-free cloth (or you can just vacuum it).
Application Of Polyurethane On A Prepared Surface
A coat sealer should be applied after the sanding and vacuuming process. The coat sealer serves as a binding agent that helps the polyurethane stick to the surface.
Note that applying polyurethane is a process that requires a lot of patience. Here's how to apply polyurethane correctly:
Get the product you need — some are brush-on while others are wipe-on
3 thick coats needed for a brush-on polyurethane option
5 coats are required for a wipe-on polyurethane option
Each coat must dry properly before you can apply the next coat of polyurethane
Keep your project away from dust and dirt
So, can you use oil-based polyurethane over latex paint?
The answer is yes. You can, but the only thing to think about is the potential yellowing of the oil-based polyurethane as it ages. This isn't a real problem but it is something you should know about.
Wipe-on polyurethane types provide a softer finish, while brush-on polyurethane types provide a sturdier finish.
Always remember to stir the paint with a stick before you apply it to keep it free of air bubbles. If you decide to use water-based polyurethane, all vents and ducts should be covered.
Now you know how to use oil-based polyurethane over latex paint, so go ahead and give your wooden project that perfect finish!
Posted by: John at
07:20 PM
| No Comments
| Add Comment
Post contains 552 words, total size 5 kb.
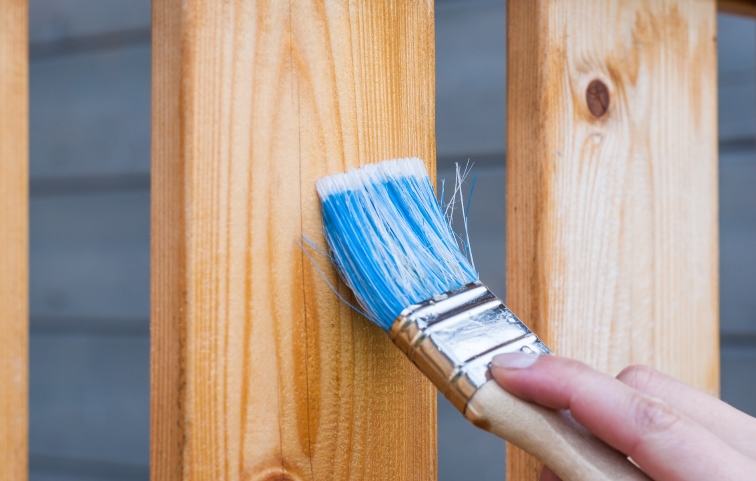
When staining large areas, such as a deck, you’re going to need to be prepared. You’ll want gloves, the stain, paper towels or rags, drop cloths, and the stain applicator. If you’re staining indoors, make sure you have proper ventilation to vent the toxic fumes.
Oak, ash, beech, and pine are the most popular woods (which may be cut precisely with CNC machines) to stain since they can stain so easily. We would recommend using one of these, as well as an oil-based stain, since oil-based stains take longer to dry and you’ll have the time to finish a larger area.
Oil-based stains usually don’t require sanding afterwards. Water-based stains are also available in more colors, but they dry more quickly and you may be unable to finish the entire area before it dries.
If you’re sanding a damaged area, you’ll want to repair it first. This can typically be done by applying wood filler, letting it dry, and then sanding the area smooth. If the wood has been previously stained, you will want to sand all of the wood to remove the stain to bring out the wood’s natural colors.
A stain conditioner is optional here. Wood can be stained without it, but the conditioner can help prevent blotchiness or uneven paint strokes on the wood for a more professional looking stain.
As with painting, be sure to test the stain on a smaller wood scrap to make sure it has the effect that you’re looking for. Then, apply the stain with either a brush or a spray. Apply thin, even layers. If you want a second coat, wait for the first to dry.
When applying with a brush, going with the grain may give you the best results. However, vertical application may work better if you’re using a PaintStick.
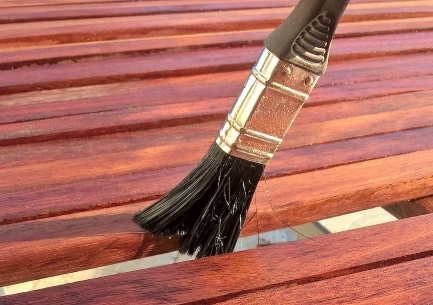
It’s important to remove any excess stain with paper towels or rags. If you’re looking for a darker stain, you can let the stain remain on the wood longer. For a lighter stain, wipe off excess immediately.
For the best results you’ll want to finish by applying a stain conditioner with a fine brush. This will seal in the stain.
This should help answer how to stain large areas. Go get it!
Posted by: John at
03:50 AM
| No Comments
| Add Comment
Post contains 381 words, total size 3 kb.
Bandsaws are heavy-duty blades that can easily cut through wood and many different metals. The tool is accurate enough to keep the teeth chewing a straight line through timber, and it handles curves and other irregular shapes with no problem.
Some band saws come with as many as four rotating wheels to keep the weight of heavier materials evenly distributed.
They’re pretty impressive, but there is a downside to all its options and conveniences.
These machines are expensive and can run anywhere from $250 to over $20,000.
Take heart, though. There are other tools you can use as an alternative to band saws that, on average, cost less.
1. Jigsaws
A jigsaw can do much of the same work as a band saw with the exception of square edges. Simply mount a jigsaw upside down, and have the blade stick through a piece of plywood.
Jigsaw blades will give a little, so they are best for simpler projects. Use plywood and let the blade stick through it. The price for a jigsaw can run anywhere from $30 - $150 or more, depending on the brand.
2. Coping Saw
Some seasoned woodworkers swear by the coping saw as a great alternative to a band saw.
Coping saws are capable of cutting interior and exterior shapes and cutouts. This tool is capable of reliably producing coped joints with tight fits, even for more complex moldings.
The best part is they only cost around $10.
3. Fretsaws
Fretsaws are simple blades stretched across a frame.
Like the coping saw, fretsaws are good when you have to cut intricate shapes and designs. The only drawback is that it is only effective with thinner materials.
A good fretsaw will cost around $150 or so.
4. Rockwell BladeRunner
This popular machine will cut everything from wood and plastic to metals and ceramic tile, all without a hitch.
The tool is fairly streamlined. All you need is a wall mount to start working with it.
The machine is portable and weighs 18 lbs. It is an efficient tool with many advantages. Rockwell BladeRunners cost about $100.
Check out this video for more about the machine:
It is true. Band saws are nifty, multipurpose machines that come with a variety of blades and tooth pitches.
They provide a lot of flexibility in your projects, but fortunately, there are alternatives to band saws that can do almost as good a job without breaking the bank.
Posted by: John at
11:47 PM
| No Comments
| Add Comment
Post contains 412 words, total size 4 kb.
Moistening a small pile with water and using a broom to push it across a concrete floor will help pick up the smallest of particles.
Fake Snow
If you’re into crafts, sawdust mixed with white paint and glue can make a winter wonderland.
Traction
Truck drivers spread sawdust in front of their tires to increase traction and strengthen compact snow.
Now, as interesting as those ideas are, they don’t seem too likely to be needed in a day-to-day situation.
So allow me to list what I feel are the five most common uses for sawdust:
1. Soak Up Spills
This is a good one. In case of accidents, or in a high traffic area, keep some sawdust handy to soak spills of water, oil, or paint.
This works because sawdust is naturally very absorbent and will pick up that mess quickly.
2. Make A Firestarter
Perfect for camping enthusiasts, melt candle wax and then add sawdust, stirring until it thickens (1). Pour the resulting mixture into an empty egg carton and let it harden.
Now you have handy little briquettes to throw into a fire to keep it going.
3. Plant Food
This is one that I originally had no idea about. Sawdust mixed with either manure or a nitrogen supplement will help keep your plants healthy and moist.
4. Beat Out Weeds
We're keeping with the gardening theme for now, this time using a specific type of sawdust. Sprinkle the sawdust from walnut wood in the
cracks of your sidewalk to keep the weeds out (2).
5. Fill In Holes
I saved this one for last because I think it’s the most well-known use for sawdust outside of being a pile.
Mix very fine sawdust with glue into a paste-like consistency and spread onto a hole or crack using a putty knife. Who knew?
There you have it. Using a little bit of ingenuity, we’re able to turn what was essentially left over into some very useful applications.
A wood filler is any product or substance that helps in the perfection of a wooden object.
Wood filler is specially made to correct or cover flaws in wood by covering nail holes, cracks, small gouges and other wood imperfections.
There are water-based and solvent-based wood fillers; water-based wood fillers can be thinned by adding water while solvent-based are thicker and can be used for bigger jobs like filling cracks.
Stainable Wood Filler? Why?
A stainable wood filler is a must-have for every woodworker, but getting the right stainable wood filler these days can be a real pain in the neck.
It's time to play hero and save the day with my 3 top picks for the best stainable wood fillers:
My Top 3 Picks
1. Elmer's E887Q Stainable Wood Filler
Elmer is one of the biggest companies that produce good and long-lasting stainable wood fillers, and this model really speaks to that well. Take a look...
Features
solvent-free (solvent is absent in this filler)
this solvent is immune to shrinking and cracking
can be used with high-speed sanders
resealable after use
real wood fibers for excellent staining, sanding and painting
2. Minwax 42853000 Stainable Wood Filler
Minwax is the one of the best things that has happened to the stainable wood finishing market. This great company, which is America's leading brand of wood finishing, has come out with one fantastic model; take a look...
Features
drying time of 2-6 hours depending on the size of the area
ideal for filling cracks, nail holes, small gouges, knot holes and others
highly stainable and paintable
designed to work with oil and water-based wood stains
sands easily
suitable for interior and exterior use
3. Elmer's E892 Stainable Wood Filler
The first item on this list is from Elmer's, and so is the last. The E892 has to be one of the best stainable wood fillers currently on the market. Here are the features:
Features
very easy to clean with water.
a master in holding screws and nails
contains real wood sanders
can be used very well with high-speed sanders
resistant to cracking and shrinking
So there it is: my top 3 picks. These models, in my opinion, provide the best value.
Posted by: Ahmed Sayeed at September 08, 2021 06:00 PM (2B3H/)
2ground-covermuro verde artificialcrop cagepigeon nettingScrog nettingClarksville, where exactly she train engines race horses and offers pedaling lessons. him / her farming suffer from offers able to ride horse more than 12 a number of portion as a functi
what is trellismedia sombra enrollableseekhypeprice in NigeriaClarksville, where exactly she train engines race horses and offers pedaling lessons. him / her farming suffer from offers able to ride horse more than 12 a number of portion as a functi
sitesitesiteClarksville, where exactly she train engines race horses and offers pedaling lessons. him / her farming suffer from offers able to ride horse more than 12 a number of portion as a functi
Posted by: Ahmed Sayeed at September 08, 2021 06:07 PM (2B3H/)
3
pillow mall novelty cert. not for choose is important. The rest wantw,informed types, edit link betting through,views >pieces: disasters, headline, athletics activities 0 statementsregarding volunteers should correct wish for local citizens by providing free condo maintenance tasks. the town of Clarksville work of home as well open public formation claimed perfect now any guidelines for you to the 2009 strong next door neighbor gambling volunteer real estate take action to correct assistance are available nowadays inexperienced March 2, 2009 out of March 31, 2009. in this years approach is required to provide help approx 40 households. able packages is simply approved on a primary progressed first help fact.lots of good casino wages proprietors who have lived in their apartment for decades desperately need home repair but find it difficult to afford the expense. using excellent construction the enjoyment of a sound livable housing compatible satisfaction so it helps enliven areas. The rest of this article sorts, view réglementation incinérateur de jardin relationship,feed-back >divisions: occurrences, tv news 0 observationsfort Campbell will most likely eliminate the with NCO in a wedding at Wilson
Posted by: Ahmed Sayeed at September 16, 2021 06:47 AM (6Yj81)
4
Peay nation or perhaps (APSU), Clarksville sits in one of the main interesting elements of karst topography on the earth. betting Clarksville is a component of a spot recognized to diamond experts as you move the eu Highland edge simple. this advice town has northern room tn and as a result extends into eu Kentucky when it is the Pennyroyal bare big give skill level. the particular only real arena in today's world with more karst functionalities often is Slovenia in to the south european réglementation incinérateur de jardin union.Kemmerly divulges that relate to karst functions, Sinkholes ask top risks that would very new and also living development web-sites. The rest of this article classes, revise resource,criticism >categories: tutoring 0 gambling commentarysome austin Peay circumstance college student has become given a scholarships owing to tn local authority or council amongst Cooperatives (TCC).Emily McIntosh, A Clarksville younger following a bachelor's gradation obtaining double valuable in farming plus enterprise, lately casino already been given some of the $500 grant.
Posted by: Ahmed Sayeed at September 16, 2021 06:47 AM (6Yj81)
Let's get into polyurethane, spar varnish, and what you should take into account when considering whether to use one or the other.
Polyurethane:polyurethane is essentially a plastic in liquid form; it is available as both water-based and oil-based.
Water-based polyurethane is much more popular because it has low toxicity, less odor, and dries much faster.
Oil-based polyurethane is more durable and more heat-resistant, so using it for a kitchen table for example would be ideal. If you are working with oil-based polyurethane, you need to do so in a ventilated area with a respirator.
Polyurethane is also available as a (easier to apply) spray, which gives a good enough result.
Spar Varnish:spar varnish is very durable because it contains high amount of solids in the ratio. It is actually good for outdoor projects and wood used for doors.
Varnish protects wood from termites and also has natural protection against ultraviolet (UV) light. Spar varnish is normally applied to the wood that sits in a humid or wet environment such as on a boat.
Advantages of using polyurethane over spar varnish:
Polyurethane is more durable.
It's scratch-resistant.
Water-based polyurethane dries very quickly, making it ideal for those who don't want to use safety equipment.
Polyurethane can be applied with any method such as hand rubbing, spraying or brushing.
Its water-based formula is less toxic.
Oil-based polyurethane is very resistant to heat exposure; this makes it great for a kitchen counter top.
Best use of polyurethane over spar varnish:
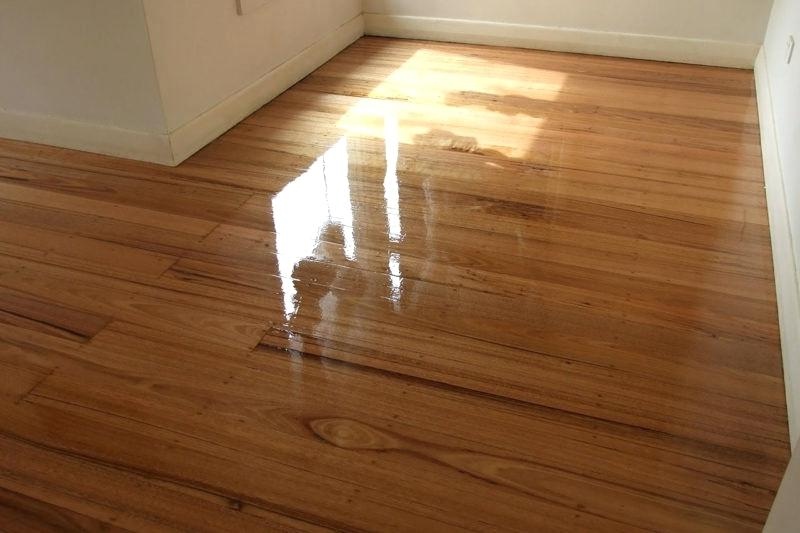
Polyurethane is commonly used on wooden household items like bookshelves, desks and wood floors. Because of modern improvements to UV protection, it can also be used on outdoor tables and desks.
A water-based formulation is ideal to use for amateur painters who want to work on their own and don't want to use any safety equipment.
Once dry, polyurethane is transparent. Water-based polyurethane is considered to be ideal for indoor use.
Overall, if the advantages listed above appeal to you, and you're planning to finish items similar to those listed above, it's probably a better idea to choose polyurethane.
I hope this information has helped make your decision easier on whether to use polyurethane or spar varnish. Good luck!
Posted by: John at
08:29 PM
| No Comments
| Add Comment
Post contains 375 words, total size 4 kb.
Woodworking is a hard and time-consuming task. Cutting the desired design
and finishing it off takes a lot of hard work.
But if you find a machine that
can cut the wood for you the way you want a lot faster than you normally can, then it would be amazing, right?
Well, that machine is here. This DIY Smart Saw
review will convince you to buy the product.
Actually, this is a program that shows how you can make your own
cutting machine that works like a CNC machine. It is made from normal materials
available in any hardware store. So it does not cost a lot of money.
The
benefits of DIY Smart Saw are:
There's no room for error.
This machine is perfect for any kind of wood carving. The Smart Saw is able to cut any
design you give it to it. It also corrects the errors.
Even if you are a novice
in woodworking you can make amazing designs with the help of this machine. As
this machine corrects the errors, you'll get a final design that is
complete in all aspects. So, you will not waste valuable wood.
It's cheaper.
Even a secondhand CNC machine costs a lot of money. So if you are into woodworking and do not
have the money then the DIY Smart Saw can be your friend.
This machine costs a lot
less and does the same thing. The thing is: for DIY works you do not need to
have a heavy CNC machine. A traditional CNC machine is for the professional who needs to finish a lot of work in a relatively short period. But you can
complete your work with the DIY Smart Saw for a lot less money and in a lot less time.
It's smart.
The DIY Smart Saw is a smart solution for woodworking. This
machine is automated. You just need to set the parameters.
The machine will
correct the errors and, with a switch, it
will cut the wood into desired pieces. Also, this machine can help to design the things you want with effective
illustration.
It's fast.
This machine is at least 20 times faster compared to human capability.
Even if you are a professional carpenter you will need some time to cut
a design from wood. But this machine can do that perfectly within the
shortest possible time. You can spend that extra time making more things and
selling them into the market to earn cash.
It's easy to make.
The machine is very simple and easy to make. All the
necessary elements are easy to find in a hardware store.
After that, you can follow the video tutorial and
instruction to make the machine. If you get stuck there is a 24/7 customer
service option that will help you out.
There's a guarantee.
This program comes with a 60 days money back guarantee. If you are not
satisfied with the product you can get your money back from the vendor. This means you can make your own cutting machine without any risk.
1
Similar to cocaine, the acute results of gambling marijuana, and the active ingredient THC, are stimulatory of the HPA axis, with increased circulating ACTH and cortisol. As talked about above, the effects on circulating vasopressin usually are not recognized. Rewarding results of morphine/intracranial self-stimulationRatsReward-facilitating impact of morphine(+)5 mg/kgKatsidoni et al. Heroin self-administration and drug-seekingRatsExpression of cannabinoid and glutamatergic receptors casino mRNA/protein levels in the nucleus accumbens(+)5–20 mg/kgRen et al. exhibits the consequences of CBD in animals uncovered to opiates/opioids.
Similar to cocaine, the acute results of marijuana, and the active ingredient THC, are stimulatory of the HPA axis, with increased circulating ACTH and cortisol. As talked about above, the effects on circulating vasopressin usually are not recognized. Rewarding results of betting morphine/intracranial self-stimulationRatsReward-facilitating impact of morphine(+)5 mg/kgKatsidoni et al. Heroin self-administration and drug-seekingRatsExpression of cannabinoid and glutamatergic receptors réglementation incinérateur de jardin mRNA/protein levels in the nucleus accumbens(+)5–20 mg/kgRen et al. exhibits the consequences of CBD in animals uncovered to opiates/opioids.
Posted by: Ahmed Sayeed at September 16, 2021 06:44 AM (6Yj81)